
Page path:
- Home
- Infrastructure
- Lab infrastructure
- Core Scanners & Loggers
- Multi Sensor Core Logger
- Color Reflectance (track system)
Color Reflectance (track system)
Spectrophotometer on the MSCL - Quick start
- 1.Click on the program icon on the desktop: MSCL 7.9
- 2.Click on “Log New Core”
- 3.Click on "D:\geotek\_____".
- 4.Click: ok
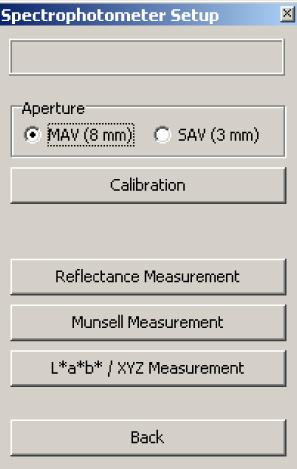
- 5.Fill in Core ID _______ in the next panel as well as the step size, e. g., 2 cm and click: spectrophotometer on, MAV and in case it is wanted click on Munsell (Note that this option increases the measurement time. See table below).
- 6.Click on show setup. Make sure the spectrophotometer opening is uplifted 11 cm above the track.
Now click on zero calibration (everey morning and always after the instrument has been switched off). Wait until 3 flashes are done.
Click on white calibration (every morning and always after the instrument has been switched off) after another person has placed the white calibration piece under the measurement window (white ring).
Wait until the flashes are done. - 7.Click: ok
- 8. Now the Logger Control panel appears: with the acoustic motor in manual mode, adjust the spectrophotometer in the way that it touches the surface of the section and that the upper transducer escapes 5 to 10 mm in the housing (while touching the sediment surface).
Put the motor back to automatic mode ! - 9. Click: ok, then type 25 or 40 (depending on the morphology of the surface),
and click ok again: wait until the acoustic motor drives up the spectrophotometer for the chosen distance.
Make sure that the spectrophotometer has got enough space between surface and measurement-window (white ring). It must be avoided that a core section can bump into the spectrophotometer. - 10. With the pusher motor in manual mode move the pusher to the reference point (blue). Put the motor to automatic mode and click ok.
- 11. With the scroll bar move the pusher to the nominal position.
- 12. Place the section (covered with Hostaphan foil), adjust if necessary with the scroll bar and click on “begin scan”.
- 13. When the pusher comes to the reference point, it moves automatically back.
- 14. Place next section, adjust with the scroll bar if necessary and click on “begin scan”. Go on with the following sections.
- 15. When the last section of a core is almost done, use the dummy for pushing.
- 16. At the end of the core click on "File", "create ASCII file": save data in the right folder (same ID as the files).
- 17. Click on "Options", "Process data". A new panel appears.
- 18. Click on "Options", "Processing panel".
- 19. Click on "File", "create ASCII file": save in the right folder.
- 20. For a new core create a new folder. Then continue with 8.

Turn off
- Turn off the PC
- Power off at microprocessor unit (below right)
- Switch interface box off
- Flip switch at the transformer box to "0".